
Tooth Fairy Doll – Free Tutorial and Pattern
This pattern originally appeared on and was an exclusive that I designed for a wonderful blog: sewmamasew.com way back in February 2014. Since it’s no longer online, I thought it was a good idea to reshare it here.
Download your own free Tooth Fairy Doll Pattern today!
When my daughter recently lost her first tooth she then proceeded to really lose it, literally. After searching for several hours (Yay! We found it!), I decided that we needed to have a safe (and fun) spot for her to store it while she awaited the tooth fairy. It seemed quite appropriate that the tooth fairy would be the inspiration for a great place (complete with a tooth pocket). As a *bonus* it makes it easy for the actual tooth fairy to collect in the middle of the night!

Materials:
All you need is a couple small pieces of pretty cotton quilter’s fabric, some Kona cotton for her skin color (I like the color Pale Flesh), a bit of wool felt for her hair and the pattern here.

You’ll also need stuffing, pins, matching thread, scissors, a bit of embroidery thread for her eyes and mouth, some hand needles and, of course, your beloved sewing machine.

Cutting Preparation:
You’ll need to cut out (4) arm pieces, (4) leg pieces and (2) full head pieces from the Kona. Cut (2) body pieces on fold, and (1) pocket piece on fold from your first cotton print, and an approximately 21″ on fold x 8″ of your coordinating cotton for the skirt piece. To make this easy, I recommend a 45″ wide cotton yardage piece that you can cut 8″ from the edge.

Sewing:
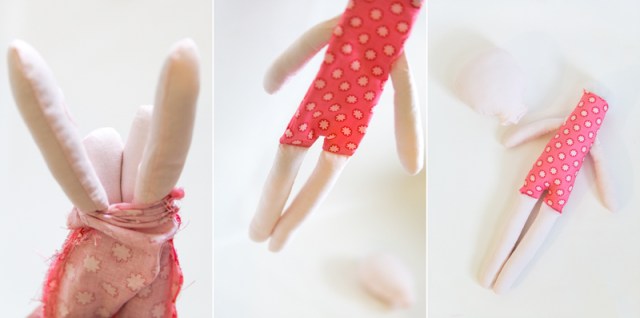
Sew along the short edge of the skirt fabric to form a loop, then hem the top and bottom. I used a 1-1/2″ hem along the bottom, and a 5/8″ hem along the top.

Next, sew your pocket right sides together, leaving a hole in the bottom for turning. Topstitch on your tooth that you cut from your white wool felt. (What? You didn’t cut it yet? Okay, go do that now… I’ll wait.) Once that’s all sewed on nicely, attach the pocket to the front side of your skirt loop.

Now it’s time to gather up your skirt. I like to use jean stitch thread, knot it at the back seam and sew a loose running stitch under the top hem line. Leave good amount of length at the end of this and set it aside; you’ll use this thread to attach it to the doll’s body later.

Sew the two head pieces– and each of the two sets of arm and leg pieces– leaving the flat edges open for turning and stuffing. I used my pinking shears to cut around the curved edges to help them lay better once turned.

Turn and stuff all (5) pieces. I recommend that you lightly stuff the limbs. Don’t make them really firm, but keep them soft and plush. You’ll thank me later.

Sew the arm pieces to the sides of one body piece with a 1/4″ inch seam. Also, sandwich in the two leg pieces individually inside the body layers; pin and sew them across, then pin the crotch piece in a U-shape, making sure to avoid catching the leg pieces in your sewing.

Pin down one side of the entire body sandwiching all the limbs inside, then sew the 5/8″ seam. Turn to the other side, arrange the limbs so that they fit snugly inside, pin together and sew down the other side. Aren’t you glad that you didn’t over-stuff those limbs now? You’re welcome!
I find it easiest to pull the arms out of the hole to make room for turning and then pull on the legs and the body fabric in the opposite direction to turn it all right side out. The flat seam between the legs and the body, along with a firmly stuffed body, will make it easy for her to sit on her own once she is fully stuffed. Oh, yes! You should probably stuff her body now!

Turn her neck under 1/4″ or so and pin back. Tuck her body underneath her neck, using the same pins to pin the two pieces together. Use a ladder stitch to blind stitch the body to her head.

Attach the skirt now to her body, using the extra thread you used from gathering it. Arrange the gathers evenly around the body, then tack it in several spots to keep it all together nicely.

Cut the two hair pieces from your wool felt color of choice, and sew along the top edges to make a pocket.

Turn right sides out, and tack down in the three spots as shown in the photo below. (I like to use three strands of embroidery thread for this step.)

Use pins to play around with her eye positioning, and when it feels right sew on some eyes. Then stitch on a mouth.

Hey, look at that! You’re done! She’s all ready to guard those lost teeth now.

